Soporte & Consultoria

Soporte Remoto y Consultoria skype : ambiorixg12.
Nota no se brinda ningun tipo de consulta o soporte fuera del blog de forma gratuita

martes, 31 de marzo de 2015

Guardando llamadas no respondias en el cdr de asterisk

nano  /etc/asterisk/cdr.conf


[general]
enable=yes
unanswered = yes


https://wiki.asterisk.org/wiki/display/AST/Asterisk+12+Configuration_cdr

lunes, 30 de marzo de 2015

Polycom 330 Setup

Polycom Soundstation IP330 Setup

Back to voip setup guides directory

  1. Power up the phone.
  2. The IP address will be picked from the DHCP server on your network and will be displayed on the LCD.
  3. Open a web browser on your PC and type the SoundStations's IP address in the address field (make sure that your PC and SoundStation are on the same network).
  4. This will present you with the configuration web page for the IP330.
  5. Click on the SIP link. This will ask for your username and password.

    The Default Admin Username is Polycom and the Default Admin Password is 456.
  6. Enter the Outbound Proxy and Server 1 values as follows:
    Polycom Soundstation IP330 Setup
  7. Press the Submit button and it will save the settings and reboot the unit.
  8. When the phone has rebooted, click on Line link and enter the values in Identification section as follows:
    Polycom Soundstation IP330 Setup
  9. Press the Submit button and it will save the settings and reboot the unit.
  10. On rebooting, your phone should have connected to the VoIPtalk service. To test this dial 902. You should hear a confirmation message played back to you.

FreePBX paging


We’ve never written about paging technology before, and this is one of those areas of VoIP telephony where it certainly paid to wait. What a difference a few years makes! At least in the Asterisk® context, SIP-based paging traditionally involved issuing a Page command with a list of extensions in your dialplan. The wrinkle was that each VoIP phone manufacturer had its own SIP header to trigger autoanswer on its phones. And, without autoanswer, paging becomes next to worthless with desktop phones. Then came FreePBX®. It took all the pain out of the process by using the *80 prefix to issue a page to almost any type of SIP phone. The one wrinkle was that Grandstream and a few other phones require that autoanswer be enabled for paging in the device configuration. Aside from that, any user can pick up a phone on a PBX in a Flash system and dial *80707 to page extension 707 with duplex voice communications through the speakerphones, meaning both parties can talk and listen to each other, the perfect VoIP intercom. And, there’s more good news. Paging works with almost all of the major phone manufacturers’ phones: Aastra, Digium, Grandstream, Linksys/Sipura, Mitel, Polycom, SNOM, and Yealink. In addition, the SIP-compatible Cyberdata ceiling speaker and Cyberdata POE Doorphone/Intercom with Keypad function just like a SIP phone.
For small groups of phones, paging now works equally well using the FreePBX Paging Module which allows an administrator to preconfigure a group of phones, specify whether to skip busy extensions, barge into busy extensions and place existing callers on hold, or whisper the page to the busy extensions. You can even enable or disable duplex communications during the page. Think of it as instant conference. The module also provides the flexibility for individual phone users to block pages from one or more extensions or even all extensions. Finally, the module lets you create and save multiple configurations for different purposes, and you can designate an Announcement message that plays to every page recipient. For organizations that need additional functionality including Page Scheduling and Automatic Page Alerts on Outbound Routes, take a look at the Schmooze PagingPro module. And, for a historical look at the evolution of paging on the Asterisk platform, see Chapter 11 of Asterisk: The Definitive Guide (4th edition). Better yet, buy the book!
So why do we need paging? In the corporate setting, it provides a perfect emergency broadcast service for fires, earthquakes, patient escapes from the loony bin, etc. In a school setting, it could inexpensively replace costly public address systems requiring dedicated wiring, speakers, and amplifiers. The Asterisk paging solution has the added benefit of letting anyone broadcast from anywhere by simply picking up a nearby phone and dialing some (hopefully password-protected) extension number. Separate RTP streaming IP addresses also could be configured on departmental phones to allow automobile dealership zone paging for parts, sales, or service. So a receptionist could park a call and then announce it to a particular department by pressing a softkey on the sidecar. And you still could have an additional emergency channel that reaches everybody. Just set up a different number to page each zone as well as the entire organization.
So that’s where we were until a week ago when Brian Kelly of PIAF Forum fame began exploring Multicast RTP Paging with Asterisk and AirPlay. Think of Multicast RTP as a radio station that streams data on a particular IP address and port. If you happen to have Multicast-aware SIP phones, they can “tune in” to particular channels of interest. And, whenever a stream is broadcast on one of the channels the phone device is preconfigured to listen to, it will go off hook just as if it had received a page as outlined above. The major advantage to RTP streaming is that there is only a single stream of data on a single channel whereas paging to multiple extensions requires a channel of data for every extension. If you want to follow along with today’s project, just configure one of the Multicast RTP streams on your phone with the port and IP address shown below.
The wrinkle is your phone devices must support Multicast RTP streaming, and many current models do not. Our VoIP Phone of the Year, the Yealink T46G, qualifies. So do some of the Aastra, SNOM (v7), and Linksys/Cisco phones (with quirks!). And the Cyberdata speaker and doorphone (above) support Multicast RTP streaming as well. Digium Phones currently do not. If you know of other phones that support Multicast RTP streams, please post a comment. You’ll know if your particular phone supports it if it has a configuration section in the manual that looks something like this:
The good news is current versions of Asterisk including 1.8, 10, and 11 support Multicast RTP Streaming and PIAF-Purple and PIAF-Green come preconfigured for RTP Multicast Streaming. A single line of dialplan code is all you need to initiate a broadcast:
exten => 1234,1,Dial(MulticastRTP/basic/224.0.0.1:1234)
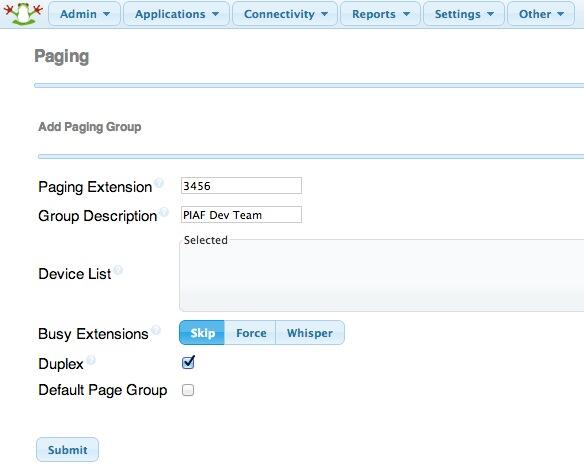
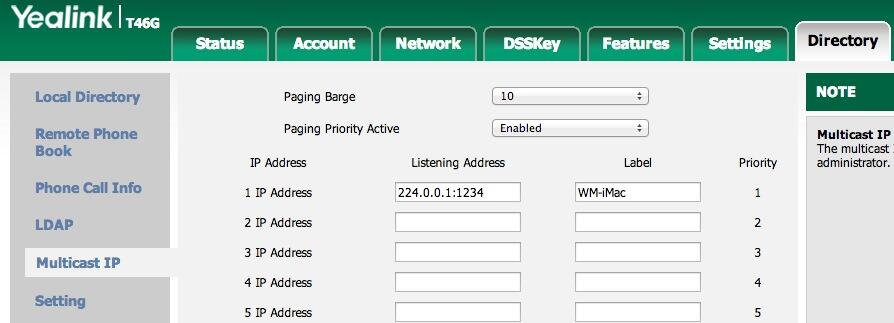
This would cause the Multicast RTP Stream broadcast to begin on port 1234 of IP address 224.0.0.1 as soon as someone on your PBX in a Flash server dialed extension 1234 and began to speak. Every phone or SIP device listening for broadcasts on port 1234 from IP address 224.0.0.1 would receive the listen-only page on their speakerphone.
Of course, Brian was not content to merely issue a page from Asterisk to his SIP phones. He wanted all of them to be able to listen to his iTunes music collection using his iPhone or iPad. This required AirPlay, but AirPlay can only stream to iOS devices. Well, not so fast. An enterprising guru on SourceForge created his own AirPlay emulator called Shairport4w. This is a Windows application that works just like an AirPort server. It “listens” for content from an iPhone or iPad that has designated Shairport4w as its AirPlay device. iTunes has the ability to stream music to any AirPlay device including the Shairport4w. So that was half of the puzzle. That got iTunes music playing great on the Windows desktop.
But we needed the other piece of the puzzle. We needed to push the music from the Windows machine to the SIP phones using Multicast RTP streaming. Brian found the missing piece of the puzzle for that as well. It’s called Multicast Streamer for Windows and it’s available at no cost from CodeProject. Simply download and unzip the bundle of goodies and run Multicast Streamer on your Windows desktop together with Shairport4w. Shairport4w captures the incoming AirPlay stream and pushes it to the sound card.
Now we simply need to configure the sound card as the input device for Multicast Streamer and make the appropriate settings to broadcast the RTP stream to port 1234 on IP address 224.0.0.1. This was the listening port and IP address we configured on our SIP phones. Be sure to also adjust the Samples per second to 8,000 and the Bits per Sample to 16.
Your mileage may vary but in our case the only output device showing on Multicast Streamer was Microphone. What we needed was Stereo Mix to capture data from the sound card rather than the microphone. If yours is missing, do the following. Right-click on the Speaker icon and switch to the Recording tab. If you don’t see Stereo Mix, then Right-click on an empty area and make sure that both “Show Disabled Devices” and “Show Disconnected Devices” are checked. When the Stereo Mix option appears, Right-click on it and check Enable. Set the level to 100. Now it will also appear as an input device when you restart Multicast Streamer. Choose it as the default input device, make sure all your other settings match what we outlined above, and then click Start to begin the stream. Now stroll over to your iPod music player app on your iPhone or iPad, choose Shairport4w as the AirPlay output device, and play away. To cancel the stream on any phone, just hangup the speakerphone. Enjoy!

martes, 24 de marzo de 2015

Migrating from chan_sip to res_pjsip

Migrating from chan_sip to res_pjsip

\

Overview

This page documents any useful tools, tips or examples on moving from the old chan_sip channel driver to the new chan_pjsip/res_pjsip added in Asterisk 12.

Configuration Conversion Script

There is a script available to provide a basic conversion of a sip.conf config to a pjsip.conf config. It is not intended to work for every scenario or configuration; for basic configurations it should provide a good example of how to convert it over to pjsip.conf style config.
To insure that the script can read any #include'd files, run it from the /etc/asterisk directory or in another location with a copy of the sip.conf and any included files. The default input file is sip.conf, and the default output file is pjsip.conf. Any included files will also be converted, and written out with a pjsip_ prefix, unless changed with the --prefix=xxx option.

SIP Session Establishment

SIP Session Establishment

This section details session establishment between two SIP User Agents (UAs): Alice and Bob. Alice (sip:alice@atlanta.example.com) and Bob (sip:bob@biloxi.example.com) are assumed to be SIP phones or SIP-enabled devices. The successful calls show the initial signaling, the exchange of media information in the form of SDP payloads, the establishment of the media session, then finally the termination of the call. HTTP Digest authentication is used by Proxy Servers to authenticate the caller Alice. It is assumed that Bob has registered with Proxy Server Proxy 2 as per Section 2 to be able to receive the calls via the Proxy.

3.1. Successful Session Establishment

Alice Bob | | | INVITE F1 | |----------------------->| | 180 Ringing F2 | |<-----------------------|
     |                        |
     |       200 OK F3        |
     |<-----------------------|
     |         ACK F4         |
     |----------------------->|
     |   Both Way RTP Media   |
     |<======================>|
     |                        |
     |         BYE F5         |
     |<-----------------------|
     |       200 OK F6        |
     |----------------------->|

     |                        | 
 

Unsuccessful Registration 401

2.5. Unsuccessful Registration

Bob SIP Server | | | REGISTER F1 | |------------------------------>| | 401 Unauthorized F2 | |<------------------------------| | REGISTER F3 | |------------------------------>| | 401 Unauthorized F4 | |<------------------------------| | | Bob sends a SIP REGISTER request to the SIP Server. The SIP server provides a challenge to Bob. Bob enters her/his user ID and password. Bob's SIP client encrypts the user information according to the challenge issued by the SIP server and sends the response to the SIP server. The SIP server attempts to validate the user's credentials, but they are not valid (the user's password does not match the password established for the user's account). The server returns a response (401 Unauthorized) to Bob's SIP client. Message Details F1 REGISTER Bob -> SIP Server REGISTER sips:ss2.biloxi.example.com SIP/2.0 Via: SIP/2.0/TLS client.biloxi.example.com:5061;branch=z9hG4bKnashds7 ;received=192.0.2.201 From: Bob <sips:bob@biloxi.example.com>;tag=a73kszlfl To: Bob <sips:bob@biloxi.example.com> Call-ID: 1j9FpLxk3uxtm8tn@biloxi.example.com CSeq: 1 REGISTER Contact: <sips:bob@client.biloxi.example.com> Content-Length: 0 Johnston, et al. Best Current Practice [Page 10]

RFC 3665              SIP Basic Call Flow Examples         December 2003


   F2 Unauthorized SIP Server -> Bob

   SIP/2.0 401 Unauthorized
   Via: SIP/2.0/TLS client.biloxi.example.com:5061;branch=z9hG4bKnashds7
    ;received=192.0.2.201
   From: Bob <sips:bob@biloxi.example.com>;tag=a73kszlfl
   To: Bob <sips:bob@biloxi.example.com>;tag=1410948204
   Call-ID: 1j9FpLxk3uxtm8tn@biloxi.example.com
   CSeq: 1 REGISTER
   WWW-Authenticate: Digest realm="atlanta.example.com", qop="auth",
    nonce="f1cec4341ae6ca9c8e88df84be55a359",
    opaque="", stale=FALSE, algorithm=MD5
   Content-Length: 0


   F3 REGISTER Bob -> SIP Server

   REGISTER sips:ss2.biloxi.example.com SIP/2.0
   Via: SIP/2.0/TLS client.biloxi.example.com:5061;branch=z9hG4bKnashd92
   Max-Forwards: 70
   From: Bob <sips:bob@biloxi.example.com>;tag=JueHGuidj28dfga
   To: Bob <sips:bob@biloxi.example.com>
   Call-ID: 1j9FpLxk3uxtm8tn@biloxi.example.com
   CSeq: 2 REGISTER
   Contact: <sips:bob@client.biloxi.example.com>
   Authorization: Digest username="bob", realm="atlanta.example.com",
    nonce="f1cec4341ae6ca9c8e88df84be55a359", opaque="",
    uri="sips:ss2.biloxi.example.com",
    response="61f8470ceb87d7ebf508220214ed438b"
   Content-Length: 0

   /*  The response above encodes the incorrect password */


   F4 401 Unauthorized SIP Server -> Bob

   SIP/2.0 401 Unauthorized
   Via: SIP/2.0/TLS client.biloxi.example.com:5061;branch=z9hG4bKnashd92
    ;received=192.0.2.201
   From: Bob <sips:bob@biloxi.example.com>;tag=JueHGuidj28dfga
   To: Bob <sips:bob@biloxi.example.com>;tag=1410948204
   Call-ID: 1j9FpLxk3uxtm8tn@biloxi.example.com
   CSeq: 2 REGISTER
   WWW-Authenticate: Digest realm="atlanta.example.com", qop="auth",
    nonce="84f1c1ae6cbe5ua9c8e88dfa3ecm3459",
    opaque="", stale=FALSE, algorithm=MD5
   Content-Length: 0 


401 Notes

On sip trace You need to go through to the end of the 2xx, 3xx, 4xx, 5xx or 6xx response, except that if you get 401, you need to go through to the end of the result of the repeat of the INVITE with authentication.


401 is not an error. It is normal stage in the registration process. If the registering device doesn't proceed beyond the 401, it means it does not know how to authenticate itself.

21.4.2 401 Unauthorized

   The request requires user authentication.  This response is issued by
   UASs and registrars, while 407 (Proxy Authentication Required) is
   used by proxy servers.


When a UAS receives a request from a UAC, the UAS MAY authenticate
   the originator before the request is processed.  If no credentials
   (in the Authorization header field) are provided in the request, the
   UAS can challenge the originator to provide credentials by rejecting
   the request with a 401 (Unauthorized) status code.

lunes, 23 de marzo de 2015

custom parking lot


exten => 74,1,Answer
exten => 74,n,Set(PARKINGDYNAMIC=700)
exten => 74,n,park()
exten => 74,n,hangup

[parkedcallstimeout]
exten=>s,1,Set(CALLERID(name)="PARKED CALL")
exten=>s,2,Dial(SIP/100&SIP/102,60)
same=>n,Set(PARKINGDYNAMIC=700)
same=>n,park(,,,,s)

martes, 17 de marzo de 2015

Filtro de llaamdas cortas (60 segundos).

[default]
exten=>_3455,1,Answer()
exten=>_3455,2,Set(RESULT=${SHELL(cat /root/badcalls.conf | grep -w -F ${CALLERID(num)} | wc -l)})
same=>n,verbose( this is the  ${RESULT})
same=>n,GotoIf($[${RESULT}>0]?bad:good)
same=>n(bad),Playback(im-sorry)
same=>n,Hangup()
same=>n(good),MusicOnHold()
exten=>h,1,ExecIf($[${CDR(duration)}<60]?System(echo ${CDR(duration)}  ${CALLERID(num)} >>/root/badcalls.conf))
exten=>h,2,ExecIf($[${CDR(duration)}>=60]?System(echo ${CDR(duration)}  ${CALLERID(num)} >>/root/goodcalls.conf))
exten=>h,3,Verbose( call duration ${CDR(duration)})


El mismo sistema usando Gosub.

[marlon]
exten => _871210,1,Gosub(filter,3455,1)
exten => _871210,2,Playback(demo-thanks)
exten=>h,1,ExecIf($[${CDR(duration)}<60]?System(echo ${CDR(duration)}  ${CALLERID(num)} >>/root/badcalls.conf))
exten=>h,2,ExecIf($[${CDR(duration)}>=60]?System(echo ${CDR(duration)}  ${CALLERID(num)} >>/root/goodcalls.conf))
exten=>h,3,Verbose( call duration ${CDR(duration)})


[filter]
exten=>3455,1,Noop()
exten=>3455,2,Set(RESULT=${SHELL(cat /root/badcalls.conf | grep -w -F ${CALLERID(num)} | wc -l)})
same=>n,verbose( this is the  ${RESULT})
same=>n,GotoIf($[${RESULT}>0]?bad:good)
same=>n(bad),Verbose( dropping the call)
same=>n,Hangup()
same=>n(good),verbose(Good call)
same => n,Return


audio file recomendation


It's best to have files in the native format of the connecting device; that reduces transcoding & resampling. Downsampling a 16kHz file to 8kHz to get it to a G.711 law device, on-the-fly, doesn't produce better results in perceptible audio quality than beginning with an 8kHz file

If you store all of your sound files as 48kHz signed linear files, but your clients were 8kHz a-law clients or 16kHz G.722 clients, then you'd have to down-sample each of those sound files, and downsampling costs CPU cycles

Voice channels on a PRI operate using G.711 u-law or a-law coding; 8kHz.

I don't know why your sound files at something greater than 8kHz aren't playing back properly.


The sampling rate in the file has to match the default sampling rate for the corresponding codec in Asterisk. .wav files are treated as being in the SLIN codec, which is 16 bit samples at 8kHz rate. Asterisk doesn't adapt to the metadata in .wav files.

8kHz is the Nyquist rate for 4kHz bandwidth. That was the carrier spacing on analogue multiplexes, and is based on the fact that most of the frequencies necessary for speech lie between 300Hz an 3.4kHz, giving 4kHz when you allow for reasonably realisable channel filters. For digital systems, it is the anti-aliasing filters than need to be realised. A lot of work has gone into making telephony systems efficient, and any better sound quality just wastes bandwidth.


http://forums.asterisk.org/viewtopic.php?f=1&t=92675

lunes, 16 de marzo de 2015

Actualizando Vicidial 2.9 al 2.11

REQUIRED STEPS!!!

1. Check system_settings, make sure you are at DB Schema Version 1378 or higher
If not, run the instructions for 2.7 to 2.9 before this section.

2. upgrade the MySQL asterisk database(you have two options):
A. Running the upgrade file directly from Linux:
mysql -f --database=asterisk < /path/from/root/extras/upgrade_2.10.sql -p

B. Going into mysql and executing the upgrade sql file:
mysql
use asterisk
\. /path/from/root/extras/upgrade_2.10.sql
quit

3. install new files:
perl ./install.pl
NOTES: If you have customized any scripts in the bin or agi folders,
then make sure you back them up before running the install.pl script.
This script will replace existing files in the astguiclient installation.

4. For each of your ViciDial servers, go the Admin -> Servers -> Modify Server
page and set each one to "Rebuild conf files = Y" and click submit.
This will rebuild the conf files to ensure any changes are updated.

5. On one server only, update your phone codes data:
/usr/share/astguiclient/ADMIN_area_code_populate.pl --purge-table --debug


###############################################################

27  wget http://tcpdiag.dl.sourceforge.net/project/astguiclient/astguiclient_2.11rc1.zip
 
   31  yum install unzip

   33  unzip  ast*
   34  ls
   35  cd extras
 
   53  mysql -f --database=asterisk < upgrade_2.10.sql -p

   56  cd ..
  
   58  perl ./install.pl

   61  /usr/share/astguiclient/ADMIN_area_code_populate.pl --purge-table --debug
   62  reboot

martes, 10 de marzo de 2015

Asterisk- How to 'whisper' music using ChanSpy(), or any alternative?

4 down vote accepted
The question of best approach depends on what exactly your trying to do. You only specified that you want to whisper music/message to a single participent. Removing them from the conference for that will only be MORE complicated. As far as how to, here is approximate code:
Dialplan:
[whisper-to-participant]
exten => s,1,Answer()
exten => s,n,ChanSpy(<Participants channel>,w)
Then originate a call (in this example were using a call file, although AMI would work just fine) as:
Channel: Local/s@whisper-to-participant
Application: Playback
Data: <prompt/music file>
While my syntax may not be perfect here, this is the basic idea of how to stream/whisper data to a single participant.


http://stackoverflow.com/questions/8099018/asterisk-how-to-whisper-music-using-chanspy-or-any-alternative

miércoles, 4 de marzo de 2015

How to Install Asterisk 13 and PJSIP on CentOS 6

With the release of a certified branch of Asterisk 13, the Asterisk training team decided now is the time to provide a brief set of “install from source” instructions. What follows is my three step program to install Asterisk 13. If you are experienced with earlier versions of Asterisk there are some changes to consider, namely the new SIP channel driver powered by the PJSIP SIP stack. The new channel driver is called PJSIP and has been the topic of a few wiki articles and conference presentations already. The original SIP channel driver has been moved to extended support and will not compile by default in Certified Asterisk 13. If you’re still unclear about the impact of the new channel driver, I encourage you to dig into resources linked from this post.


lunes, 2 de marzo de 2015

The Session Description Protocol (SDP)-VoIP

The Session Description Protocol (SDP)-VoIP Part 2

When a SIP based VoIP call is established, the audio or video sent between two SIP entities or more is streamed. Since many different codecs are supported by different devices or software, and each individual SIP entity taking part in the call does not know the IP address of the other SIP entity or to which port the stream should be sent to, SDP is used to advertise such details about the media stream during the VoIP call initialization process.

domingo, 1 de marzo de 2015

AMI Interface PHP EXAMPLE

<?php
$command=$_GET["cmd"];
$socket = fsockopen("127.0.0.1","5038", $errno, $errstr, 10);
      if (!$socket){
        echo "$errstr ($errno)\n";
        }else{
            fputs($socket, "Action: Login\r\n");
            fputs($socket, "UserName: admin\r\n");
            fputs($socket, "Secret: 1456\r\n\r\n");

            fputs($socket, "Action: Command\r\n");
            fputs($socket, "Command: $command\r\n\r\n");

           fputs($socket, "Action: Logoff\r\n\r\n");
           while (!feof($socket)){
               echo fgets($socket).'<br>';
            }
            fclose($socket);
            }
?>


http://6.11.11.22/ami_monitor.php?cmd=core%20show%20channels


Hint

Be careful to use just one Return (\r\n) after "Action" and doublereturn (\r\n\r\n) after "Command".
Example (in PHP):
fputs($socket, "Action: Command\r\n");
fputs($socket, "Command: show dialplan\r\n\r\n");