Installing and Configuring ODBC
The ODBC connector is a database abstraction layer that makes it possible for Asterisk to communicate with a wide range of databases without requiring the developers to create a separate database connector for every database Asterisk wants to support. This saves a lot of development effort and code maintenance. There is a slight performance cost, because we are adding another application layer between Asterisk and the database, but this can be mitigated with proper design and is well worth it when you need powerful, flexible database capabilities in your Asterisk system.
Before you install the connector in Asterisk, you have to install ODBC into Linux itself. To install the ODBC drivers, use one of the following commands.
On CentOS:
-----------------------------------------------------------------------------------------------------------------------Archivos de configuracion funcionales de mi servidor
/etc/odbc.ini
[asterisk-connector]
Description = MySQL connection to 'asterisk' database
Driver = MySQL
Database = asterisk
Server = localhost
UserName = root
Password = myspassword
Port = 3306
Socket = /var/lib/mysql/mysql.sock
/etc/odbcinst.ini
# Example driver definitions
# Driver from the postgresql-odbc package
# Setup from the unixODBC package
[PostgreSQL]
Description = ODBC for PostgreSQL
Driver = /usr/lib/psqlodbc.so
Setup = /usr/lib/libodbcpsqlS.so
Driver64 = /usr/lib64/psqlodbc.so
Setup64 = /usr/lib64/libodbcpsqlS.so
FileUsage = 1
# Driver from the mysql-connector-odbc package
# Setup from the unixODBC package
[MySQL]
Description = ODBC for MySQL
Driver = /usr/lib/libmyodbc5.so
Setup = /usr/lib/libodbcmyS.so
Driver64 = /usr/lib64/libmyodbc5.so
Setup64 = /usr/lib64/libodbcmyS.so
FileUsage = 1
/etc/asterisk/res_odbc.conf
dtodocomputadoras*CLI>cdr show status
Call Detail Record (CDR) settings
----------------------------------
Logging: Enabled
Mode: Simple
Log unanswered calls: No
Log congestion: No
* Registered Backends
-------------------
cdr-custom
Adaptive ODBC
csv
Module Description Use Count
app_cdr.so Tell Asterisk to not maintain a CDR for 0
app_forkcdr.so Fork The CDR into 2 separate entities 0
cdr_adaptive_odbc.so Adaptive ODBC CDR backend 0
cdr_csv.so Comma Separated Values CDR Backend 0
cdr_custom.so Customizable Comma Separated Values CDR 0
cdr_manager.so Asterisk Manager Interface CDR Backend 0
cdr_odbc.so ODBC CDR Backend 0
cdr_sqlite3_custom.so SQLite3 Custom CDR Module 0
cdr_syslog.so Customizable syslog CDR Backend 0
func_cdr.so Call Detail Record (CDR) dialplan functi 0
10 modules loaded
$ sudo yum install unixODBC unixODBC-devel libtool-ltdl libtool-ltdl-devel
If you’re using a 64-bit installation, remember to add
.x86_64 to the end of your development packages to make sure the i386 packages are not also installed, as stability problems can result if Asterisk links against the wrong libraries.$ sudo apt-get install unixODBC unixODBC-dev
See Chapter 3, Installing Asterisk for the matrix of packages you should have installed.
You’ll also need to install the unixODBC development package, because Asterisk uses it to build the ODBC modules we will be using throughout this chapter.
The unixODBC drivers shipped with distributions are often a few versions behind the officially released versions on thehttp://www.unixodbc.org website. If you have stability issues while using unixODBC, you may need to install from source. Just be sure to remove the unixODBC drivers via your package manager first, and then update the paths in your
/etc/odbcinst.ini file.
By default, CentOS will install the drivers for connecting to PostgreSQL databases via ODBC. To install the drivers for MySQL, execute the following command:
$ sudo yum install mysql-connector-odbc$ sudo apt-get install odbc-postgresql
Or to install the MySQL ODBC connector on Ubuntu:
$ sudo apt-get install libmyodbc
Configuration for the PostgreSQL ODBC driver is done in the
On CentOS the default file already contains some data, including that for PostgreSQL, so just verify that the data exists. The file will look like the following:
Verify that the system is able to see the driver by running the following command. It should return the label name
/etc/odbcinst.ini file.On CentOS the default file already contains some data, including that for PostgreSQL, so just verify that the data exists. The file will look like the following:
[PostgreSQL]
Description     = ODBC for PostgreSQL
Driver          = /usr/lib/libodbcpsql.so
Setup           = /usr/lib/libodbcpsqlS.so
FileUsage       = 1
On Ubuntu, the
/etc/odbcinst.ini file will be blank, so you’ll need to add the data to that configuration file. Add the following to the odbcinst.ini file:[PostgreSQL] Description = ODBC for PostgreSQL Driver = /usr/lib/odbc/psqlodbca.so Setup = /usr/lib/odbc/libodbcpsqlS.so FileUsage = 1
On 64-bit systems, you will need to change the path of the libraries from
In either case, you can use cat > /etc/odbcinst.ini to write a clean configuration file, as we’ve done in other chapters. Just use Ctrl+D to save the file once you’re done./usr/lib/ to /usr/lib64/ in order to access the correct library files.Verify that the system is able to see the driver by running the following command. It should return the label name
PostgreSQL if all is well:Next, configure the$odbcinst -q -d[PostgreSQL]
/etc/odbc.ini file, which is used to create an identifier that Asterisk will use to reference this configuration. If at any point in the future you need to change the database to something else, you simply need to reconfigure this file, allowing Asterisk to continue to point to the same place[141]:[asterisk-connector] Description = PostgreSQL connection to 'asterisk' database Driver = PostgreSQL Database = asteriskcdrdb Servername = localhost UserName = asterisk Password = welcome Port = 5432 Protocol = 8.1 ReadOnly = No RowVersioning = No ShowSystemTables = No ShowOidColumn = No FakeOidIndex = No ConnSettings =
Configuration for the MySQL ODBC driver is done in the
On CentOS the default file already contains some data, including that for MySQL, but it needs to be uncommented and requires a couple of changes. Replace the existing text with the following:
Verify that the system is able to see the driver by running the following command. It should return the label name
/etc/odbcinst.ini file.On CentOS the default file already contains some data, including that for MySQL, but it needs to be uncommented and requires a couple of changes. Replace the existing text with the following:
[MySQL]
Description = ODBC for MySQL
Driver = /usr/lib/libmyodbc3.so
Setup = /usr/lib/libodbcmyS.so
FileUsage = 1
On Ubuntu, the
/etc/odbcinst.ini file will be blank, so you’ll need to add the data to that configuration file. Add the following to the odbcinst.ini file:[MySQL] Description = ODBC for MySQL Driver = /usr/lib/odbc/libmyodbc.so Setup = /usr/lib/odbc/libodbcmyS.so FileUsage = 1
On 64-bit systems, you will need to change the path of the libraries from
In either case, you can use cat > /etc/odbcinst.ini to write a clean configuration file, as we’ve done in other chapters. Just use Ctrl+D to save the file once you’re done./usr/lib/ to /usr/lib64/ in order to access the correct library files.Verify that the system is able to see the driver by running the following command. It should return the label name
MySQL if all is well:# odbcinst -q -d
[MySQL]
Next, configure the /etc/odbc.ini file, which is used to create an identifier that Asterisk will use to reference this configuration. If at any point in the future you need to change the database to something else, you simply need to reconfigure this file, allowing Asterisk to continue to point to the same place:[asterisk-connector] Description = MySQL connection to 'asterisk' database Driver = MySQL Database = asterisk Server = localhost UserName = asterisk Password = welcome Port = 3306 Socket = /var/lib/mysql/mysql.sock
Connecting to Microsoft SQL (MS SQL) is similar to connecting to either MySQL or PostgreSQL, as we’ve previously discussed. The configuration of MS SQL is beyond the scope of this book, but the following information will get your Asterisk box configured to connect to your MS SQL database once you’ve enabled the appropriate permissions on your database.
To connect to MS SQL, you need to install the FreeTDS drivers using the package manager (or by compiling via the source files available at http://www.freetds.org).
On CentOS:
Insert the following text into the
To connect to MS SQL, you need to install the FreeTDS drivers using the package manager (or by compiling via the source files available at http://www.freetds.org).
On CentOS:
$ sudo yum install freetds$ sudo apt-get install freetds/etc/odbcinst.ini file, which tells the system where the driver files are located.Insert the following text into the
/etc/odbcinst.ini file with your favorite text editor or with the following command:$ sudo cat > /etc/odbcinst.ini
[FreeTDS]
Description = ODBC for Microsoft SQL
Driver = /usr/lib/libtdsodbc.so
UsageCount = 1
Threading = 2
Ctrl+D
If you compiled via source, the files may be located in
Verify that the system is able to see the driver by running the following command. It should return the label name /usr/local/lib/ or (if you compiled on a 64-bit system) /usr/local/lib64/.FreeTDS if all is well:Once you’ve configured the drivers, you need to modify the$odbcinst -q -d[FreeTDS]
/etc/odbc.ini file to control how to connect to the database:[asterisk-connector] Description = MS SQL connection to 'asterisk' database Driver = FreeTDS Database = asterisk Server = 192.168.100.1 UserName = asterisk Password = welcome Trace = No TDS_Version = 7.0 Port = 1433In the next section, you will be able to validate your connection to the MS SQL server.
Now, verify that you can connect to your database using the isql application. echo the
select 1 statement and pipe it into isql, which will then connect using theasterisk-connector section you added to /etc/odbc.ini. You should get the following output (or at least something similar; we’re looking for a result of 1 rows fetched):With unixODBC installed, configured, and verified to work, you need to recompile Asterisk so that the ODBC modules are created and installed. Change back to your Asterisk source directory and run the$echo "select 1" | isql -v asterisk-connector+---------------------------------------+ | Connected! | | | | sql-statement | | help [tablename] | | quit | | | +---------------------------------------+ SQL> +------------+ | ?column? | +------------+ | 1 | +------------+ SQLRowCount returns 1 1 rows fetched$exit
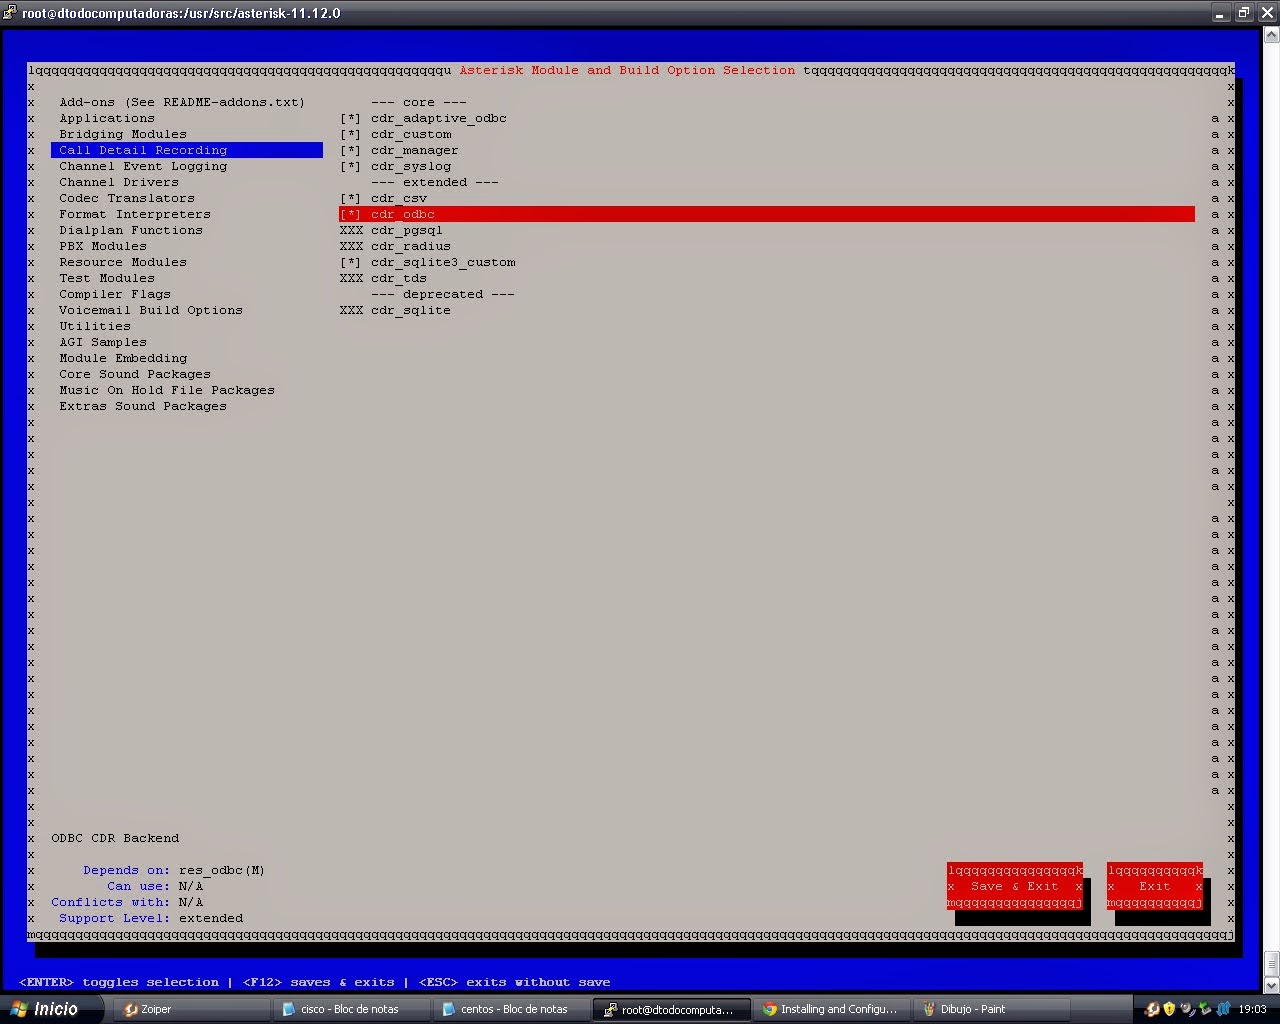
./configure script so it knows you have installed unixODBC:$cd ~/src/asterisk-complete/asterisk/1.8$./configure$make menuselect$make install
Almost everything in this chapter is turned on by default. You will want to run make menuselect to verify that the ODBC-related modules are enabled. These include
cdr_odbc, cdr_adaptive_odbc, func_odbc, func_realtime, pbx_realtime, res_config_odbc, and res_odbc. For voicemail stored in an ODBC database, be sure to select ODBC_STORAGE from the Voicemail Build Options menu. You can verify that the modules exist in the /usr/lib/asterisk/modules/ directory.
Asterisk ODBC connections are configured in the
Once you’ve configured
res_odbc.conf file located in /etc/asterisk. The res_odbc.conf file sets the parameters that various Asterisk modules will use to connect to the database.
The
Modify the pooling and limit options are quite useful for MS SQL and Sybase databases. These permit you to establish multiple connections (up to limit connections) to a database while ensuring that each connection has only one statement executing at once (this is due to a limitation in the protocol used by these database servers).res_odbc.conf file so it looks like the following:[asterisk] enabled => yes dsn => asterisk-connector username => asterisk password => welcome pooling => no limit => 1 pre-connect => yesThe
dsn option points at the database connection you configured in /etc/odbc.ini, and the pre-connect option tells Asterisk to open up and maintain a connection to the database when loading the res_odbc.so module. This lowers some of the overhead that would come from repeatedly setting up and tearing down the connection to the database.Once you’ve configured
res_odbc.conf, start Asterisk and verify the database connection with the odbc show CLI command:*CLI>odbc showODBC DSN Settings ----------------- Name: asterisk DSN: asterisk-connector Last connection attempt: 1969-12-31 19:00:00 Pooled: No Connected: Yes
[141] Yes, this is excessively verbose. The only entries you really need are
Driver, Database, and Servername. Even the UserName and Password are specified elsewhere, as you’ll see later (although these are required when testing, as in the section called “Validating the ODBC Connector”).-----------------------------------------------------------------------------------------------------------------------Archivos de configuracion funcionales de mi servidor
/etc/odbc.ini
[asterisk-connector]
Description = MySQL connection to 'asterisk' database
Driver = MySQL
Database = asterisk
Server = localhost
UserName = root
Password = myspassword
Port = 3306
Socket = /var/lib/mysql/mysql.sock
/etc/odbcinst.ini
# Driver from the postgresql-odbc package
# Setup from the unixODBC package
[PostgreSQL]
Description = ODBC for PostgreSQL
Driver = /usr/lib/psqlodbc.so
Setup = /usr/lib/libodbcpsqlS.so
Driver64 = /usr/lib64/psqlodbc.so
Setup64 = /usr/lib64/libodbcpsqlS.so
FileUsage = 1
# Driver from the mysql-connector-odbc package
# Setup from the unixODBC package
[MySQL]
Description = ODBC for MySQL
Driver = /usr/lib/libmyodbc5.so
Setup = /usr/lib/libodbcmyS.so
Driver64 = /usr/lib64/libmyodbc5.so
Setup64 = /usr/lib64/libodbcmyS.so
FileUsage = 1
/etc/asterisk/res_odbc.conf
[asterisk]
enabled => yes
dsn => asterisk-connector
username => root
password => myspassword
pooling => no
limit => 1
pre-connect => yes
dtodocomputadoras*CLI>cdr show status
Call Detail Record (CDR) settings
----------------------------------
Logging: Enabled
Mode: Simple
Log unanswered calls: No
Log congestion: No
* Registered Backends
-------------------
cdr-custom
Adaptive ODBC
csv
todocomputadoras*CLI> odbc show all
ODBC DSN Settings
-----------------
Name: asterisk
DSN: asterisk-connector
Last connection attempt: 1969-12-31 19:00:00
Pooled: No
Connected: Yes
dtodocomputadoras*CLI> module show like cdrModule Description Use Count
app_cdr.so Tell Asterisk to not maintain a CDR for 0
app_forkcdr.so Fork The CDR into 2 separate entities 0
cdr_adaptive_odbc.so Adaptive ODBC CDR backend 0
cdr_csv.so Comma Separated Values CDR Backend 0
cdr_custom.so Customizable Comma Separated Values CDR 0
cdr_manager.so Asterisk Manager Interface CDR Backend 0
cdr_odbc.so ODBC CDR Backend 0
cdr_sqlite3_custom.so SQLite3 Custom CDR Module 0
cdr_syslog.so Customizable syslog CDR Backend 0
func_cdr.so Call Detail Record (CDR) dialplan functi 0
10 modules loaded
dtodocomputadoras*CLI> module reload res_odbc.so
-- Reloading module 'res_odbc.so' (ODBC resource)
== Parsing '/etc/asterisk/res_odbc.conf': Found
[Sep 5 22:50:19] NOTICE[26412]: res_odbc.c:1537 odbc_obj_connect: Connecting asterisk
[Sep 5 22:50:19] NOTICE[26412]: res_odbc.c:1569 odbc_obj_connect: res_odbc: Connected to asterisk [asterisk-connector]
[Sep 5 22:50:19] NOTICE[26412]: res_odbc.c:924 load_odbc_config: Registered ODBC class 'asterisk' dsn->[asterisk-connector]
dtodocomputadoras*CLI>
dtodocomputadoras*CLI> module reload cdr_adaptive_odbc.so
-- Reloading module 'cdr_adaptive_odbc.so' (Adaptive ODBC CDR backend)
== Parsing '/etc/asterisk/cdr_adaptive_odbc.conf': Found
-- Found adaptive CDR table cdr@asterisk.
> Found calldate column with type 93 with len 19, octetlen 19, and numlen (0,10)
> Found clid column with type 12 with len 80, octetlen 80, and numlen (0,0)
> Found src column with type 12 with len 80, octetlen 80, and numlen (0,0)
> Found dst column with type 12 with len 80, octetlen 80, and numlen (0,0)
> Found dcontext column with type 12 with len 80, octetlen 80, and numlen (0,0)
> Found channel column with type 12 with len 80, octetlen 80, and numlen (0,0)
> Found dstchannel column with type 12 with len 80, octetlen 80, and numlen (0,0)
> Found lastapp column with type 12 with len 80, octetlen 80, and numlen (0,0)
> Found lastdata column with type 12 with len 80, octetlen 80, and numlen (0,0)
> Found duration column with type 4 with len 10, octetlen 10, and numlen (0,10)
> Found billsec column with type 4 with len 10, octetlen 10, and numlen (0,10)
> Found disposition column with type 12 with len 45, octetlen 45, and numlen (0,0)
> Found amaflags column with type 4 with len 10, octetlen 10, and numlen (0,10)
> Found accountcode column with type 12 with len 20, octetlen 20, and numlen (0,0)
> Found uniqueid column with type 12 with len 32, octetlen 32, and numlen (0,0)
> Found userfield column with type 12 with len 255, octetlen 255, and numlen (0,0)
dtodocomputadoras*CLI>
http://www.asteriskdocs.org/en/3rd_Edition/asterisk-book-html-chunk/installing_configuring_odbc.html
No hay comentarios:
Publicar un comentario